Showing posts with label gardening. Show all posts

Tuesday, May 5, 2020

Farm Life Today


A friend of my neighbor's needed a place to graze his horse, Moe. Sweet boy!


Rose


Garden is in and growing slowly! More to add later. 


New baby plums.


Strawberries soon. 


Peas and brassicas. 


Hoof paring; the farrier was here yesterday for the donkeys.


Busy hen.


Redoing the inside of the big coop, dividing into 2 rooms for free ranging hens and separate area for the new chicks coming this week (after they get big enough to move out here)


My neighbor is bush hogging some of my fields, he is a really great guy. 


They might be hard to see


but the donkeys like to chill out in the trees behind the barn.


Hens are also hanging out behind the barn. 


Churro bundt cake mmmmm


Ready for the new chicks! I can't wait!

Friday, April 8, 2016

Farmer workout

The HOSS cultivator in action! Well, without a video, which makes it more like pre-1890s action ;)


I only took pix with the 3-tip cultivator attachment, which was tricky enough one-handed. 


I guess a better shot would have included the tines or at least a shot of the soil gracefully curving away from the tines. Ah well.


 Can't see much of the actual tool, I will have to get someone to hold it so I can take a more comprehensive photo soon!


Next step: Adding wood ash from winter and mushroom compost. Then it's planting time YAY!


The biggest one

The other trilliums in my pasture may not look like it in the previously posted photos, but they are pretty small. But today I found this monster trillium as I walked out to till the new garden! HUGE!


Saturday, April 2, 2016

I found treasure in my pasture

Trilliums growing! such a lovely gift!


Sunday, March 27, 2016

Peeking

Two of the five microgreens I planted are germinated and a third is peeking through the soil!


In the front its sunflower microgreens, in the back, beets are out and growing, chard is close behind and looks really similar LOL!

Can't wait to taste the beets, since I love beet greens starting a few days ago ;)

Tuesday, March 22, 2016

Microgreens for all!


Fill a tray with moistened seed starter, but not all the way up to the top. 


I bought these seed specifically for microgreens....how they actually differ from regular seeds of carrots, basil, kale, etc, I do not know. I might grow some all the way this spring just to see what happens LOL


Carrots, beets, chard. Sow them rather thickly. These three all have a 16-25 day germination time. 


Sprinkle some more seed starter thinly on top, although the instruction sheet that came with the seeds said fine vermiculite would also work. 


This tray is sunflower seeds (germination rather fast for these) then two rows of basil (long germination time of 16+ days). I figure you can't get sick of basil microgreens but again, I'm wondering how the basil will differ from my usual basil seeds, also growing, which I could have taken a photo of but didn't. Hmm....


The other batches I did weren't covered with anything, but the instruction sheet advised using a plastic dome (which won't really work in this case) or a "towel" and somehow that seemed a bit ambiguous to me. I immediately thought damp paper towel...so I tried that on the front tray. Since the sheet doesn't actually say damp, I used a piece of dry paper towel on the back tray. Hopefully I will record the results from dry versus damp paper towel and share that here, too! Surely!

Monday, March 21, 2016

Indoor Sun


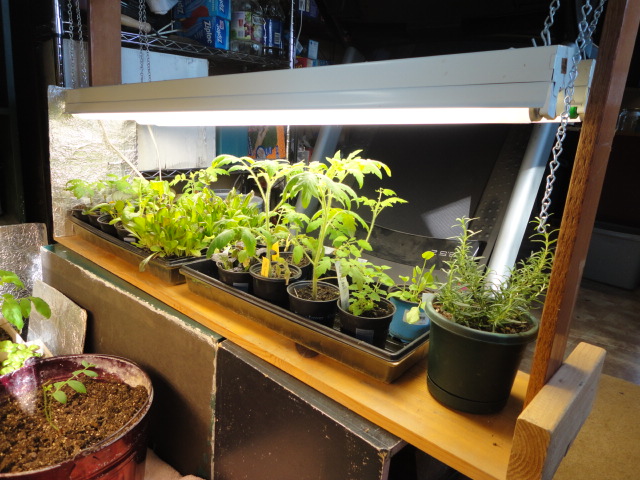
The grow lights I threw together years ago (from Future House Farm blog) are still in use even though my kitchen is tiny and I have no other place to keep the seedlings even moderately warm. Happily they are working to give the seedlings at least part of what they need!


The chain attached to the shop lights are on a hook on the stands. so raising the height of the lights are easy and can even make for one side higher than another, to accommodate swiftly growing tomatoes.

Now I just need to get the cat to stop eating my squash plants. What a brat...

And just for fun, photo of the rooster, Georgie Porgie. He is a pretty bloke but still quite wary of me.


Wednesday, March 9, 2016

Black Gold


Mushroom farms have rows and rows of pasteurized, composted manure for growing the mushrooms.


The wheat straw is composted into the manure and the mushrooms are grown inside a building in a pile of the compost. 

After the mushrooms are harvested, the compost still has lots of usable nutrients, it's just not good for growing mushrooms. So they haul the compost outside. 


Then they sell it by the scoopful to hungry gardeners like me!


Now at home is the real work of shoveling the black gold into raised beds, pots, and the field garden spots (which are as yet untilled LOL). This stuff makes your garden grow like weeds! 


Friday, December 27, 2013

Looking Back

What did I accomplish in 2013?

Rode a motorcycle by myself, for the first time. Which turned out to be the only time. LOL!
Broke my leg, got a cast, walked with crutches for a while, all also firsts.
Got addicted to World of Warcraft and leveled a warlock to 90.
Sadly said goodbye to the coolest cat ever, Hector.
Except when laid up with injury or illness, kept working out regularly throughout the year, even got jogging up to over a mile without a walking break and pushed my time down.
I got to play some fun games that won't be discussed on a G-rated blog ;).
Drank too much wine.
Finally stopped smoking, although sometimes I still want one. Briefly. Then a few minutes later it goes away. Eight years it took to say this with confidence.
Hiked lots of mountains and went to lots of Tennessee places I've never been to, or even heard about.
Didn't have enough to put up, but did enjoy some homegrown, organic fruits and veggies.
Learned a lot about egg bound chickens and dog allergies.
Watched my son become more grown up and teach himself how to script (code).
Failed to pass my organic chemistry class, but certainly learned a lot about organic chemistry.
Learned a great many low carb recipes.
Entered a 5K but didn't run in it. Sick!
Almost paid off my credit card then ran it way back up again. Sigh.

Made some new friends....but also lost a few, as well.

Realized and accepted the fact that our species will not stop drilling for oil, burning coal, and trashing our habitat. We seem to be much like the pest infections that eat all the available food and then die in vast numbers. Inevitable? Because I do believe that by now, the global effects of these actions are irrevocable. Consequences.....will most likely be rather dire. I wonder if I will live to see the worst, or if my son will have to face that alone, with his peers.

Monday, October 14, 2013

Tomato puree and juice idea....

I need to try this! But not this year, as I hardly got any tomatoes at all. Maybe next year.....

For the past 40 years, I’ve been making tomato juice and tomato purée using a deep freezer and minimal cooking.
When my excess tomatoes ripen in late August and I’m too busy to deal with them, I clean them, remove bad spots, and freeze them whole in their skins on a tray before bagging and storing them in the freezer.
When I have time to deal with the tomatoes, I decide how many I want to process, then dip the frozen balls in warm water and slip off the skins. I stack them in a dishpan and let them thaw for half a day. As the frozen tomatoes thaw, they release their juice as an almost colorless liquid. I dip this liquid out and it makes the best, freshest-tasting tomato juice ever (with or without salt added). This can be frozen or stored in the fridge for four to five days.
I drain the tomatoes until they become the consistency of sauce or purée. Then I run this mass through a blender and cook it for a few minutes before refreezing. I don’t remove the seeds, as I think they add food value to the tomato purée, but you can strain them out after a few minutes of cooking if you like. This is also a great way to make use of tomatoes that otherwise may not look the best for sale at your farmers market — and no canning necessary.
Jim Schmitt
Forest Grove, Pennsylvania


Read more: http://www.motherearthnews.com/real-food/tomato-puree-zm0z12aszhun.aspx#ixzz2hj0NqHaE

Sunday, November 11, 2012

Tutorial: How to pollinate a lemon tree


This is my dwarf Meyer lemon tree. It lives outdoors in the spring, summer, and fall, and comes inside my office to spend the winter. Usually once it comes inside it has some ripening fruit...but also some blossoms for the next fruit cycle. Since the tree is now inside, it needs to be pollinated by me! Call me foolish but it took me a few seasons to figure all of this out. I apologize in advance for not giving the proper scientific names for these plant parts! Why don't these trees come with a manual? Why don't children come with a manual? Why am I so dependent on directions? Er....getting back to pollination:


For people who already know how to do this, the pictures and directions may seem like overkill. But for those who don't know how, it takes a little practice to see the different between the two flower types, just like when you first started gardening and ALL the seedling plants looked the same! A little experience with the kinds of blossoms will hopefully teach your eyes to distinguish the difference, but once you learn it I think it stays with you always. Besides, if you already know how to do this, why are you reading this post? 

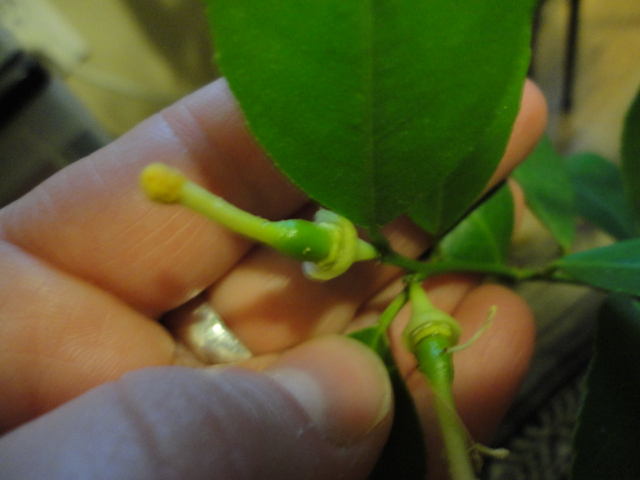
There are two kinds of flowers on this lemon tree. I believe the female flower is the one that will actually become the fruit. This flower has a long, thick stem-like structure exactly in the middle of the flower petals. It has a small knob at the end. Before pollination, this knob is white in color. After pollination, the knob becomes distinctly yellow. On the photo below the female flower is the lower blossom, pointing downward. The upper flower (surely the male!) has no middle structure. Instead it has fringy, vibrantly yellow center petalets (my word, like it?) that are heavy with loads of pollen. If you jolt the branch, pollen takes to the air and drifts around, coating the leaves and everything else in the room (the computers do not like this). 


Below shows an unpollinated female structure....it's not bright yellow yet. Sorry so blurry...one-handed photography is tricky with my camera.


Below is another picture, this one with two pollinated female flowers. See the middle structure? (okay, I found it now...that middle structure is the pistil)


The closest I can get with my camera....female flower with pistil. 


To pollinate, grab a Q-tip. Even cheap ones with work for this, although I have discovered they are pretty much useless for any other job. Stick the end of the Q-tip right inside that male plant (stop laughing!) and roll it around real good, coat that Q-tip with pollen! It doesn't seem to go as far as you would think.


This is supposed to be a picture of the Q-tip with pollen. Little tiny grains of pollen on it! In the background is a half-grown lemon. Yes, I know it looks like a lime. Why does everybody say that? Do I strike people as unable to distinguish lemons from limes? This tree has lived with me for years, give me the benefit of the doubt! This is what lemons look like before they look like lemons :)


Last step! Carry the pollinated Q-tip to a female flower pistil and rub that pollen all over it - I know, this is awfully weird and kinky! Thus is the sex life of plants. Orchids are even worse, trust me! Once the pistil is bright yellow, you should be done. I think. I am still learning here, myself. 


If you did it right, in a few days or a week (I don't time it!) the petals and other parts will fall off and you will see a bump at the base of the pistil. This is the baby lemon! I have noticed that sometimes these babies will also fall off, I don't know if it's because they just weren't pollinated enough, if they have something wrong with them, or if the tree just has too many to feed. Just make sure you have pollinated as many female flowers as possible, as you can always remove some fruit later if the tree is unable to grow that many. Also as with any fruiting plant, the more fruit you have will often mean smaller fruit. It's a fine balancing act between fruit quantity and fruit size!