Showing posts with label sustainability. Show all posts

Sunday, May 17, 2020

Chicks at about 4 days old


Two light Brahmas above


Barred rock or cuckoo maran?


Speckled Sussex above


In total, I have 2 white rocks (the yellow chicks), 2 speckled sussex (the brownish chicks), 2 golden laced Wyandotte, 2 black Jersey Giants (black heads), 2 light Brahmas (feathers on legs), 2 barred rocks,and 2 blue cuckoo marans (these last two have black around the eyes and maybe a lighter 'spot' on top of the head). The last 4 sets are REALLY hard to tell apart right now LOL!

Tuesday, May 23, 2017

MORE babies! Homemade babies!

One hen decided she wanted to raise some chicks, so she hid in a nest way up high in the hayloft so I wouldn't find her.


She collected 9 eggs and shortly after I found the nest, hatched 7 babies! These will be a mix of buff Cochin and Austrolorp (unless other hens were also laying in this nest, but I kind of doubt it).


I am wondering if this is the same hen who raised the Ameraucana babies for me (see below photo for the prettiest one, Cheese!)or if it is a different hen.


All the Austrolorps look alike to me! I need to paint designs on them or something....

Here is a great photo of Goldie, the (currently) only rooster. Although with 7 home-hatched babies now here, we may have more roosters soon....


Also, a great photo of Nibbles, who is now an only dog. Sadie developed renal disease and we had to put her down eventually.


Thanks for sharing your life with us, Sadie girl! Hope you have LOTS of chickens to obsess over wherever you are now :)


Sunday, March 5, 2017

Fostering

I had a broody hen for over a week, she was very devoted to the idea. So I bought 5 Ameracauna chicks (colored eggs in fall! yippee!) from the feed store and slipped a couple under her wings each night. She adopted them without a murmur and seems quite proud of herself ROFL! They are so adorable, even more so when I don't have to stress out about if they are warm enough or is that heat lamp gonna fall....


Wednesday, April 13, 2016

Adorable

The yellow lady in the middle is a buff Orphington. It seems I have 3 of them, so how about Honey, Nectar, and Pollen?


There are 2 golden polish with the funny topknot, I can't wait to see what they look like when they are grown LOL! Anna and Elvis ;)


There are 6 black Australorps! Supposed to be good layers AND good meat birds, so if I decide 19 new hens is too much, then at 12 weeks I might freeze some fresh chicken. Urgh. 


There are 2 of these white-faced bigguns - light Brahmas. They are supposed to mostly white when full grown, with a few black markings and FEATHERS ON THEIR FEET! how awesome is that! Frosty and Snowman is what I call these two.


Not yet pictured:  Silver gray Dorkings (2), dark Cornish (2), and Partridge Rocks (2). 


Friday, April 8, 2016

Farmer workout

The HOSS cultivator in action! Well, without a video, which makes it more like pre-1890s action ;)


I only took pix with the 3-tip cultivator attachment, which was tricky enough one-handed. 


I guess a better shot would have included the tines or at least a shot of the soil gracefully curving away from the tines. Ah well.


 Can't see much of the actual tool, I will have to get someone to hold it so I can take a more comprehensive photo soon!


Next step: Adding wood ash from winter and mushroom compost. Then it's planting time YAY!


Monday, March 21, 2016

Indoor Sun


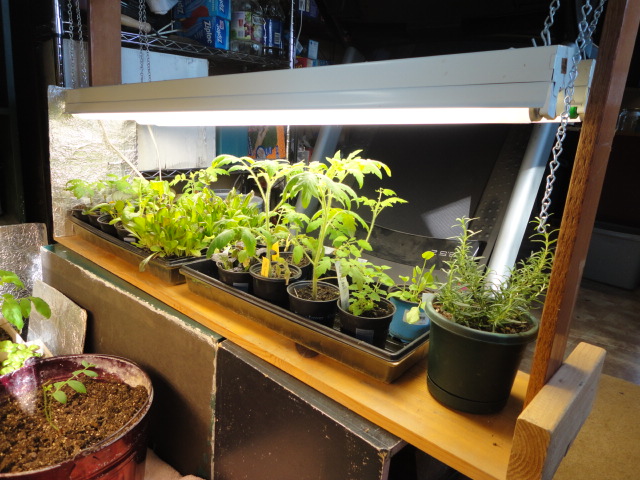
The grow lights I threw together years ago (from Future House Farm blog) are still in use even though my kitchen is tiny and I have no other place to keep the seedlings even moderately warm. Happily they are working to give the seedlings at least part of what they need!


The chain attached to the shop lights are on a hook on the stands. so raising the height of the lights are easy and can even make for one side higher than another, to accommodate swiftly growing tomatoes.

Now I just need to get the cat to stop eating my squash plants. What a brat...

And just for fun, photo of the rooster, Georgie Porgie. He is a pretty bloke but still quite wary of me.


Saturday, December 5, 2015

The Real Story About Heating with a Wood Stove


I had such high hopes when deciding to install a wood stove instead of using the 18+-year-old propane-fueled 15-year-unused furnace (i.e., a veritable deathtrap) in my new home. So, either I'm not doing it right or I have wood that isn't seasoned enough or I have far too many small rooms...whichever, it doesn't heat much! We are utilizing spacer heaters pretty regularly now that the below 40 degree weather has set in. I don't mind starting a spacer heater in the bathroom for 10 or 15 minutes before I take a shower, and I don't mind a cold bedroom since I have a dog and lots of blankets, and I really don't mind keeping an endless eye on the wood in the firebox of the stove itself to see if it needs to be topped off (I feel like Laura from Little House on the Prairie!). And honestly, I don't usually mind a room that's warmer than the rest of the house, especially since I moved things about to have a chair set up RIGHT THERE IN FRONT OF IT.


But.

Well.

The things I am finding disconcerting and embarrassingly unexpected yet tolerable (so far) include:
  • Calling the guys who bring the wood and praying they will firstly answer the phone and secondly show up when they said they would with the wood.
  • Worrying about whether we have enough wood. 
  • Fetching wood daily (or more than daily) from the wood pile in the driveway. 
  • Worrying about whether we have enough wood. 
  • Keeping the wood outside dry.
  • Worrying about whether we have enough wood.
  • Keeping enough wood stocked in the house in case it rains and the wood gets wet anyway.
  • Worrying about whether we have enough wood.
  • Splitting the wood that is too big and then worrying about having enough big pieces to last over an hour at night when I try to sleep. 
  • Worrying about whether we have enough wood.
  • Several times a day sweeping up the inevitable bits of bark and shreds of wood and tiny but numerous patches of dirt and probably creepy crawlies that skitter away as soon as I show up with a broom.
  • Worrying about whether we have enough wood.
  • Stoking up the fire every time I wake in the middle of the night to pee (which when I calculate badly means pretty much restarting the fire from scratch in the dark when I'd rather be sleeping).
  • And, of course, worrying about whether we have enough wood.

The most intolerable thing though, that is honestly starting to drive me a bit batty, is the accumulation of ash dust that is slowly, despite my attempts to sweep or brush or wipe it up, growing over the stove, the stove pipe, the stove mat that the stove sits on, the floor around the stove, the rest of the furnishings in the room, and inevitably my lungs every day as I crouch down on my knees to clean out yesterday's ashes in preparation to offer my new daily sacrifice to the fire god. 

The dust...The Dust!...THE DUST...DUSTY DUST MOTES FLOATING EVERYWHERE ALL OVER THE STOVE ALL OVER ME FILLING THE ROOM FILLING THE AIR AAAAARGH!!!

Well, it's probably still better than coal dust, in my lungs OR a miner's lungs. I need to keep remembering that. I do still think it's better than dumping a thousand years' worth of carbon into the atmosphere for a month's worth* of heat. So far, anyway. 

But hey maybe my Christmas tree will contribute to the warmth of the house for the next month! 

Happy holidays, anybody who stuck around long enough to catch this second post of the year!


*Okay, I didn't actually calculate the true carbon emission of coal-fueled electricity from
TVA into a month of small-house furnace operation. But I'm taking author's licence cause it rolled out sounding damn good. :)


Sunday, December 7, 2014

The argument....

Is it more responsible to use handkerchiefs or a kleenex-type tissue? And what about the disgust factor? It took me a while to get over the thought that using handkerchief was rubbing your face in a palmful of previously snorted germs. But now that I have been using them for years, I like them better. A lot better. I have a slightly runny nose for only a few hours most mornings, then it usually clears up. I could go through a great many boxes of tissue that way over a year. Instead, I have a stash of handkerchiefs ready for use that are softer yet more durable, and I can carry one in my purse without it disintegrating if I haven't needed to use if for a few weeks, unlike a small package of tissues. I can use 1 for a week with minimal, normal stuffiness, or 1 in an hour, if I'm sick. Then in the washbin it goes and I get a fresh, clean one. My nose doesn't get all red and scratchy and I don't have to put out the money to buy the increasingly expensive boxes that still manage to run out just when you REALLY need them. I originally switched because I thought it was more environmentally friendly, but according to this recent article, the effect might be minimal. But I'm a handkerchief user for life, now, no matter what!


Friday, February 21, 2014

Digging Our Own Grave

If not, then digging the graves of our 100x great-grandchildren's grandchildren, or some descendants betwixt.

The problems stemming from tsunami damage to Fukushima Dachii reactor plant appear to be nonstop and growing regularly, and also consuming immense amounts of water while global droughts are becoming pandemic. Although one hopes they use undrinkable saltwater to cool all that nuclear fuel, I suspect they may not. Regardless, the water is undeniably unusable in ANY form once applied to spent or melting fuel rods. For many, many generations . Aside from the morality of generating material that is still going to be radioactive so many generations in the future I don't even want to do the math, we do not have the knowledge, capability, or apparently even the incentive to properly solve nuclear mishaps on this scale. All of which means, to a sane and responsible person, we should not be utilizing this technology.

SHUT THEM ALL DOWN NOW. 


Friday, December 27, 2013

Looking Back

What did I accomplish in 2013?

Rode a motorcycle by myself, for the first time. Which turned out to be the only time. LOL!
Broke my leg, got a cast, walked with crutches for a while, all also firsts.
Got addicted to World of Warcraft and leveled a warlock to 90.
Sadly said goodbye to the coolest cat ever, Hector.
Except when laid up with injury or illness, kept working out regularly throughout the year, even got jogging up to over a mile without a walking break and pushed my time down.
I got to play some fun games that won't be discussed on a G-rated blog ;).
Drank too much wine.
Finally stopped smoking, although sometimes I still want one. Briefly. Then a few minutes later it goes away. Eight years it took to say this with confidence.
Hiked lots of mountains and went to lots of Tennessee places I've never been to, or even heard about.
Didn't have enough to put up, but did enjoy some homegrown, organic fruits and veggies.
Learned a lot about egg bound chickens and dog allergies.
Watched my son become more grown up and teach himself how to script (code).
Failed to pass my organic chemistry class, but certainly learned a lot about organic chemistry.
Learned a great many low carb recipes.
Entered a 5K but didn't run in it. Sick!
Almost paid off my credit card then ran it way back up again. Sigh.

Made some new friends....but also lost a few, as well.

Realized and accepted the fact that our species will not stop drilling for oil, burning coal, and trashing our habitat. We seem to be much like the pest infections that eat all the available food and then die in vast numbers. Inevitable? Because I do believe that by now, the global effects of these actions are irrevocable. Consequences.....will most likely be rather dire. I wonder if I will live to see the worst, or if my son will have to face that alone, with his peers.

Monday, October 14, 2013

Tomato puree and juice idea....

I need to try this! But not this year, as I hardly got any tomatoes at all. Maybe next year.....

For the past 40 years, I’ve been making tomato juice and tomato purée using a deep freezer and minimal cooking.
When my excess tomatoes ripen in late August and I’m too busy to deal with them, I clean them, remove bad spots, and freeze them whole in their skins on a tray before bagging and storing them in the freezer.
When I have time to deal with the tomatoes, I decide how many I want to process, then dip the frozen balls in warm water and slip off the skins. I stack them in a dishpan and let them thaw for half a day. As the frozen tomatoes thaw, they release their juice as an almost colorless liquid. I dip this liquid out and it makes the best, freshest-tasting tomato juice ever (with or without salt added). This can be frozen or stored in the fridge for four to five days.
I drain the tomatoes until they become the consistency of sauce or purée. Then I run this mass through a blender and cook it for a few minutes before refreezing. I don’t remove the seeds, as I think they add food value to the tomato purée, but you can strain them out after a few minutes of cooking if you like. This is also a great way to make use of tomatoes that otherwise may not look the best for sale at your farmers market — and no canning necessary.
Jim Schmitt
Forest Grove, Pennsylvania


Read more: http://www.motherearthnews.com/real-food/tomato-puree-zm0z12aszhun.aspx#ixzz2hj0NqHaE

Sunday, November 11, 2012

Tutorial: How to pollinate a lemon tree


This is my dwarf Meyer lemon tree. It lives outdoors in the spring, summer, and fall, and comes inside my office to spend the winter. Usually once it comes inside it has some ripening fruit...but also some blossoms for the next fruit cycle. Since the tree is now inside, it needs to be pollinated by me! Call me foolish but it took me a few seasons to figure all of this out. I apologize in advance for not giving the proper scientific names for these plant parts! Why don't these trees come with a manual? Why don't children come with a manual? Why am I so dependent on directions? Er....getting back to pollination:


For people who already know how to do this, the pictures and directions may seem like overkill. But for those who don't know how, it takes a little practice to see the different between the two flower types, just like when you first started gardening and ALL the seedling plants looked the same! A little experience with the kinds of blossoms will hopefully teach your eyes to distinguish the difference, but once you learn it I think it stays with you always. Besides, if you already know how to do this, why are you reading this post? 

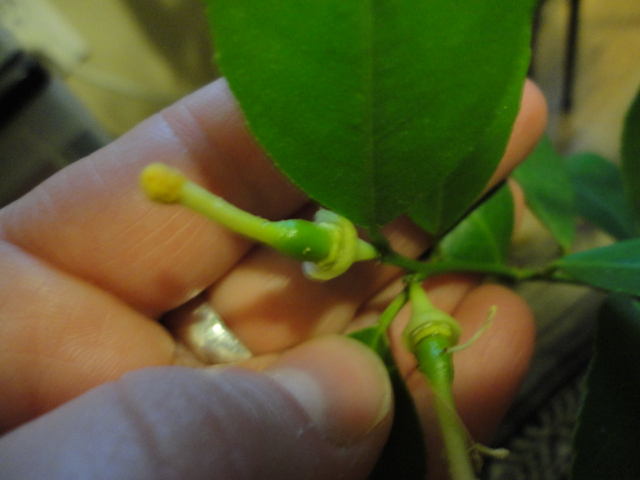
There are two kinds of flowers on this lemon tree. I believe the female flower is the one that will actually become the fruit. This flower has a long, thick stem-like structure exactly in the middle of the flower petals. It has a small knob at the end. Before pollination, this knob is white in color. After pollination, the knob becomes distinctly yellow. On the photo below the female flower is the lower blossom, pointing downward. The upper flower (surely the male!) has no middle structure. Instead it has fringy, vibrantly yellow center petalets (my word, like it?) that are heavy with loads of pollen. If you jolt the branch, pollen takes to the air and drifts around, coating the leaves and everything else in the room (the computers do not like this). 


Below shows an unpollinated female structure....it's not bright yellow yet. Sorry so blurry...one-handed photography is tricky with my camera.


Below is another picture, this one with two pollinated female flowers. See the middle structure? (okay, I found it now...that middle structure is the pistil)


The closest I can get with my camera....female flower with pistil. 


To pollinate, grab a Q-tip. Even cheap ones with work for this, although I have discovered they are pretty much useless for any other job. Stick the end of the Q-tip right inside that male plant (stop laughing!) and roll it around real good, coat that Q-tip with pollen! It doesn't seem to go as far as you would think.


This is supposed to be a picture of the Q-tip with pollen. Little tiny grains of pollen on it! In the background is a half-grown lemon. Yes, I know it looks like a lime. Why does everybody say that? Do I strike people as unable to distinguish lemons from limes? This tree has lived with me for years, give me the benefit of the doubt! This is what lemons look like before they look like lemons :)


Last step! Carry the pollinated Q-tip to a female flower pistil and rub that pollen all over it - I know, this is awfully weird and kinky! Thus is the sex life of plants. Orchids are even worse, trust me! Once the pistil is bright yellow, you should be done. I think. I am still learning here, myself. 


If you did it right, in a few days or a week (I don't time it!) the petals and other parts will fall off and you will see a bump at the base of the pistil. This is the baby lemon! I have noticed that sometimes these babies will also fall off, I don't know if it's because they just weren't pollinated enough, if they have something wrong with them, or if the tree just has too many to feed. Just make sure you have pollinated as many female flowers as possible, as you can always remove some fruit later if the tree is unable to grow that many. Also as with any fruiting plant, the more fruit you have will often mean smaller fruit. It's a fine balancing act between fruit quantity and fruit size!


Sunday, May 13, 2012

Goings on


I am the new proud keeper of the family hand-me-down rotating composter. Just need to find a little hardware to keep the bin in place.


My big new project going on, my adaptation from this idea. Funny how stuff you've been musing over can come together, just like that, with the right trigger. That white outlined piece behind the cinder blocks is part of stand-up shower I had to dismantle. I saved those pieces and AT LAST, get to use them!


I'm not sure if I ever posted about the rainwater harvester...I need to clean it out and fix something this summer, perhaps I can remember to take photos while I do it. That's how I learned how to make one, from lotsa friendly bloggers.

Friday, March 30, 2012

Seeds in and ordered!!

Okay, ordered a few seeds including chicory witloof, for homegrown endive.....let's hope that works with a very small learning curve.

Perennial-type stuff growing here regularly:
Meyer lemon tree
rhubarb
horseradish
oregano
rosemary (like a small tree!)
peach tree
raspberries
blackberries
blueberries (so far 3 years, nonproducing, hmmm)
strawberries
grape vine
hardy kiwi
carrots
spinach (from seeds last fall!)
leeks (huge, I think they are 2 years old? Also delicious)
basil (big and small)
parsley, small
garlic, hard and soft neck
elephant garlic
onions that for some reason refuse to BULB OUT. In since LAST FALL.
An unidentified green flourishing bunch of...parsley? cilantro? maybe even celery? I cut it to use while cooking, regardless. At least it's organic, eh?

Planted or seeded out or seeded inside, this week:
tomatoes - yellow, roma, grape, and meaty, and one from Beka's work. Italian?
potatoes, red of some kind
garbanzo beans
adzuki beans
purple podded pole beans
blue lake pole beans
yellow squash
Florence fennel
Japanese bunching onions
kale
kohlrabi
lots of peppers
lots of lettuce (for indoor growing)
bok choy
swiss chard
eggplant
herbs

And I bought some cress. For indoors, of course.

Tuesday, January 10, 2012

I'm Satisfied

A rousing cheer to the matron of husbandry for her frugal, almost wasteless use of an entire chicken. The best part is I have now duplicated that feat!

So, yesterday I cooked a whole chicken and after processing, this is what I have left after feeding us (probably at least 8 meals total), the dogs (4 meals or more), and a tasty cooked-carrot snack for dogs and chickens:


Yay! Now those old chickens in the pen who aren't laying any more better watch out...